
Prototyping: Where Do You Begin?
Do you have a great idea for a product, but you’re not sure what the next step is? Consider making a prototype to confirm the design and structure of your idea prior to production. Here are some quick steps to follow:
- Draw or sketch the product. Be sure to include all relevant dimensions
- You don’t have to be an artist, but a sketch does help greatly in the visualization process
- Along with the sketch, describe the material requirements, what the product will be used for and any environmental factors to consider for the design, e.g., Will it be exposed to the elements? Must it withstand extreme heat or cold?
- Consult with a design firm or a manufacturing partner like RSP that can assist you in designing a product for mass production
To determine the most efficient method of prototyping, ask these questions: What is the purpose of the prototype? Is it to judge the function of the prototype or to help establish its general form and fit?
How Do You Create a Prototype?
At RSP, we help companies large and small develop their product using prototyping. To explain RSP’s role in the prototyping process, let’s consider a simple product such as a controller (e.g., a TV remote). The controller has a plastic shell (top and bottom), a rubber keypad and a circuit board. Below, we break down the options and process for prototyping each of these layers, and what needs to be considered at each stage of development.
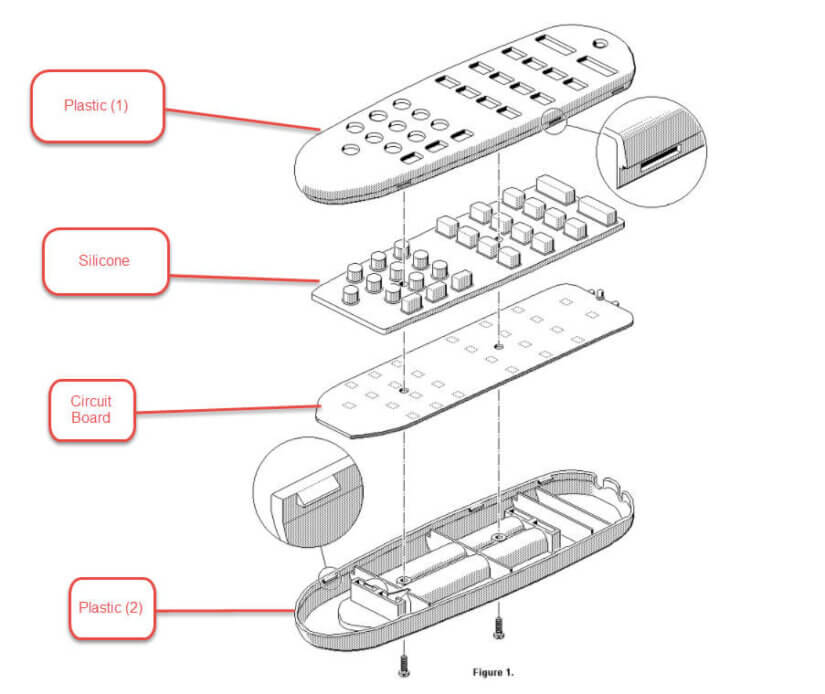
Plastic Shell
In this example, our controller is going to be made of plastic. There are two main methods of prototyping plastic: 3D printing and machining. Each method has benefits and limitations.
For example, 3D printing is fairly inexpensive, depending on the amount of samples needed. The cost is usually in the hundreds rather than thousands of dollars. The lead time is quick as well, with a 7- to 10-day turnaround. The downside to 3D-printed samples is that the printed material will not be the same as the production-quality molded plastic. So while 3D-printed samples are quick and inexpensive by comparison, they may not act as true to function as the final production-ready part. Depending on the product, a CNC prototype may be needed after the 3D-printed prototype to test for other factors, such as strength, durability, or chemical resistance, for example.
Machining a plastic part, on the other hand, requires a CNC router and other manual post-processes, like carving and sanding. This involves taking a block of plastic and carving out the product, like a sculpture. Unlike 3D printing, this method allows for the prototype to have characteristics similar to the final production part since the material can be more like the injection-molded material. A machined prototype will allow you to test the product in the actual setting where the product will be used, with some confidence that it is realistic to the final production product. The downside is that these samples are not always as visually appealing as a final production part.
Silicone Keypad
The remote control in this example has a multicolor silicone keypad for the buttons, which gives the buttons a soft feel. There are a couple of ways to make a silicone keypad sample, including a prototype tool and casting. Both options have a relatively fast turnaround time, allowing you to quickly make a decision about the keypad. You can work with a company like RSP to have graphics printed on the keypad as well. Other factors to consider when moving toward a final product include deciding on a soft vs. hard coat, or perhaps testing both to see what best suits your desired end.
Circuit Board
In most electronic products the printed circuit board assembly (PCBA) is the heart of the product. The PCBA is a multilayer electronic board that has a variety of components such as resistors, connectors, traces, pads and processors mounted to it. This is done often on the surface of the board using surface-mount technology. Validating – or testing – your electronics is one of the most important and necessary steps for any electronic product. Typically, electronics are validated by testing with a fixture. So when prototyping a circuit board, it is important to define what qualifies as a pass or fail. The test fixture can also upload the software and firmware to the circuit board. When prototyping a PCBA, there is a sample fee for the small-quantity production run as well as the fixture expense, which as mentioned above helps with the critical step of validating the product. Of course, the final test is using the prototype and validating it through user experience.
Your Turn!
Now that we have discussed some of the ins and outs of prototyping, you should have a better understanding of how to take an idea and create a production-ready part. The rest is up to you – just remember to follow the steps above.
Finally, whenever you think your product is ready to start prototyping, contact RSP at 1-866-329-1804. As always, if you get stuck along the way, our friendly support team is here to answer your questions.